Category Archives: Fun Projects

Previous Work: CSR Interface and Dashboard for MetroLINK (2012)

Static demo (w/ dummy data)

Source code (zip)

Before I begin I want to say that the code here, along with any other code I have posted, is posted with the expressed permission of the company that originally had me write it.

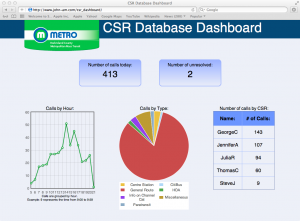
This is something I’ve been anxious to write about, I’m really happy with the results and it helped out quite a bit at MetroLINK.  It’s a web dashboard to show the call data from Metro’s Customer Service Representatives (CSRs).  It pulls data from an Access database through ODBC, and uses PHP to generate the main dashboard as well as the drill-down pages.  The graphs are provided by the excellent Flot javascript library.

Last year it was decided that more information had to be gathered in regards to how many calls the CSRs were taking, and what those calls were about.  Our phone system didn’t support anything beyond basic logging, so until the system could be upgraded something needed to be put in place that would allow the CSRs to track their own calls.  I opted for Access because it was a database system others were already familiar with, and I could make an interface easily enough by using VBA and Access’ own forms.  We saw results almost immediately, and had a much better insight into what the CSRs were doing.

Just using the Access built-in reporting functionality was great, but it was missing the “live” element.  That’s when I decided to start working on this in my spare time.  I discussed what we would need on a dashboard with my co-workers, and then set out to make it happen.

I had some hesitation when I was figuring out how to get the data from the Access file to PHP.  The same file was being used by the CSRs to input this same data, so I had been worried about the file being locked.  The Access forms were already split to avoid this, but I didn’t know how a connection from PHP  would behave.  With ODBC setting up the connection to the Access file was a breeze, and I was pleased to find out it handled multiple connections without issue.  On top of that I could specify that the connection was read-only, providing some security as well.

When I was designing the dashboard I wanted it to have a similar appearance to the public-facing website gogreenmetro.com, so I borrowed the color scheme and title image.  While the data was only changing on each refresh (more on that later) I wanted the dashboard to appear to have activity in it.  To get to this goal I included several hover-over effects and made things respond in useful ways where I could.  Primarily in the graphs and tables where you can highlight parts and get specific information about a point or pie piece.  While it isn’t perfect, it gives the dashboard a little more polish and makes it feel more “alive” than the same page without those elements.

After the main dashboard was completed I started working on the drill-down pages.  They can both be accessed by clicking the numbers for total number of calls and number of unresolved on the main page.  The unresolved drill-down is just a larger version of the breakdown by CSR, which is just building a table.  But the number of calls drill-down introduced some challenges.

On the main page I used the hour function to group calls by hour, and sent that to Flot.  It was simple, and worked for the purposes of the graph.  Moving on to the more advanced graphs though, that method was no longer going to work.  I had to use Flot’s time support, which means I needed to get milliseconds from the Unix Epoch, as that’s JavaScript’s native time format.  None of this was too challenging until timezones entered the picture.  Using Datediff to give me seconds from epoch gave me a sort of “false UTC” that treats the times as if there was no time zone offset.  Since the data would always be correct in the actual database and the presentation wasn’t affected, I saw no problems with this.  It actually encourages it in the Flot API instructions.

Until I checked the tooltips.  JavaScript corrects for time zone when you start using date functions, so all my times were coming in a few hours off.  PHP provides a great way to get the local time zone offset in seconds, so I used that to correct the difference by changing it before the page was rendered.  A side effect of this is that the times change depending on where the page is viewed, so 3pm Central would be 1pm Pacific and so on.  In this context it would probably be a bug, but in other contexts it would be a feature.

In all, this project taught me a lot.  It reinforced my knowledge of things like JSON, HTML/CSS, and how to implement designs to work cross-browser.  It gave me a chance to use PHP for a project, and I learned about it in the process.  Finally, it also gave me a chance to really use Flot and jQuery.  Being able to bring all these things together in one consistent project was a great experience.
Previous Work: Halo Stats (2010-2011)


Download the Halo Stats for TouchPad source code

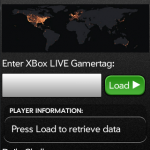
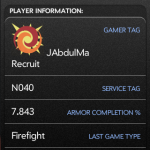
When Halo Reach was released a few years ago, I stumbled upon their statistics API and saw an opportunity for a new webOS application.  I had seen some success with my Quick Subnets app and wanted to develop more, but a creative writer’s block had set in and I couldn’t find something I wanted to build.  When I saw the API that was available, inspiration finally hit!  I created an application that allowed the user to look up any Halo Reach player and see their information.

Now, I’ll be the first person to downplay the abilities of Halo Stats.  It basically only loads player and challenge data, when other applications load all kinds of per-match statistics and information, and even display it in a better format.  But at the time, deciding to write it was a lofty goal.  I had never written an application that connects to the internet before other than some class projects in college, and I didn’t really know about AJAX and JSON beyond just the concepts of them.  Writing this was an opportunity to learn both of those concepts, and through that further expand my Javascript knowledge.

One thing I remember in particular is finding out how easy it is to access JSON compared to XML or other formats.  To do this day I opt for JSON when I can because of that.  I also remember that the frameworks used on the webOS hardware would block XMLHttpRequest calls, and wanted their abstracted versions to be used instead.  That was an adventure in troubleshooting almost worth its own post!

After I had written Halo Stats for the Palm Pre, I was actually contacted by a programmer representative at Palm who wanted to get me set up to write more apps, and even encouraged me to get a TouchPad version of the application together before it launched.  The TouchPad was using a new framework called Enyo, while the Pre had used Prototype.  So at the time I was writing code for a framework with no documentation outside the HP/Palm forums, for hardware that hadn’t been released to the public yet.  All my testing was done via web browser or emulator.  It was quite the challenge, and experience!

There are things I would definitely do different if I were to write this again though.  For me the biggest problem is in the code itself, I had some problems associating the style information to the elements that Enyo was generating; so I chose instead to set the innerHTML property of the elements to some HTML I was generating, and then I would control the styling via CSS.  This was beneficial in many ways,  I could centralize my styling, it allowed me to use techniques I was already familiar with and made the development process faster.  But it was detrimental in that I had no control of the display or positioning that was happening higher up in the software, and couldn’t predict some of the output because of that.  And the resulting code now has chunks of hard coded HTML in it, which is ultimately harder to work with in the long term.  When I made MD5 Lookup I worked around that, but I had far lower styling expectations for that program.

Staying on the styling issues – looking back I really wish I had put more time into it.  I will always claim to be a web developer before a designer, but I’m not completely blind to a bad layout.  The commendations are off-center and not vertically aligned with each other, there is a blue border around the right frame for no real reason, the challenges don’t like up with the map and other elements – and I could go on.  Ultimately the design was rushed and it makes the entire application worse.  In the future that is something I be sure to avoid, by putting in the time to properly test the styling and nitpick over the small details until it looks more refined.  Again, I’m not a designer – but that doesn’t excuse a poor layout and appearance. In retrospect I’d rather have a simple design that looks great than what happened here.

At this point the TouchPad, Pre, and webOS are outmoded, and even Bungie’s stat servers only give back historical data.  No new games are being registered on their servers.; everything has been replaced with 343’s Halo Waypoint.  But, if you have some webOS hardware or an emulator image Halo Stats is still available in the app store, and you can even look up a player’s info, as long as they played before the switch over to 343. I’ve posted the source code above as well – most of my writing is in the source folder, under SplitView.js and Splitview.css.

Thanks for reading!

I’m now known as KD0RNX

I’ve been studying the last month or so to get my Ham Radio license, and the info was just posted today!  My call sign is KD0RNX.

Here is the info:

http://wireless2.fcc.gov/UlsApp/UlsSearch/license.jsp?licKey=3367478

I’m actually already looking into the RTLSDR stuff, so once I have that set up I’ll post more about it.  Until then!

A real home network and server

Over the last few months I’ve been making steady improvements to the network and sever situation in the house I live in.  I have two roommates, so finding time to implement changes is sometimes a challenge.  They aren’t big fans of the internet going down while I upgrade things.  And when I set up a server I want to present it only after I have it running and know they can expect it to be reliable.

A few months ago I upgraded the existing network.  There were some specials on Newegg that allowed me to change up several components.  The Linksys router was switched to the Buffalo WZR-HP-G300NH.  I wanted something with the customization capabilities of DD-WRT, but a with little more memory and speed than the (still great) Netgear WNR2000.  Unfortunately, the WZR-HP-G300NH has some problems, namely the current official firmware – which is a DD-WRT build – has a wireless dropout issue.  While I linked to the DD-WRT site there, I don’t approve of the fixes on the Wiki.  Monitoring for a dropped ping and restarting the wireless interface is not a fix, it’s a hack in the derogatory sense.

I was seeing daily drops of the Wifi connection, and ultimately had to add in the old Linksys back as an AP.  I’m still using the Buffalo for wireless N, and my N devices are laptops and phones that don’t need constant connections.  Fortunately the router is rock-solid for wired connections, so with a Gigabit Switch that was also on sale I was set with enough connections and speed to set up something cool.

For the servers I had two machines:  A 2.26Ghz Pentium 4 1GB, and a Core 2 Duo 3.0Ghz  8GB server that I picked up very cheap from a friend of mine.  The Pentium 4 was already working as a media server – it couldn’t do any transcoding though, so it was actually behaving more like a glorified file server.  It also has 400GB of hard drive space, so eventually it will become a dedicated NAS.  To that end I installed a gigabit NIC in it for faster transfers.

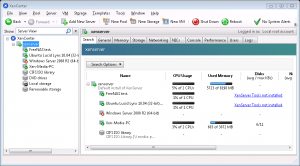
The Core 2 Duo server is where things get fun.  It supports virtualization, so it is now a XenServer box with a few different VMs on it:

XenCenter showing off my virtual machines!

Here is the VM breakdown:

  • FreeNAS – A NAS test install before I move to the actual hardware
  • Ubuntu Server – SSH tunnel entry point, as well as webapp test server
  • Windows Server 2008 – To be used later for a domain building project
  • Xen-Media-PC – The new media server to replace the Pentium 4 box

The Ubuntu server and Media PC are the most noteworthy.  The Media PC VM will be taking media streaming responsibilities as well as acting as my CrashPlan backup point.  Originally I planned to have it act as an FTP server as well, but with the NAS in place I don’t see a real need to bring that functionality in.  And with the jump in power for the Media streaming software, things like real-time transcoding and subtitle overlays are now a possibility.  Which is doubly impressive to me considering this is a virtualized environment!

The Ubuntu server isn’t as immediately impressive (it doesn’t exactly “do” anything yet) but I’m very happy with it because I’ve finally learned how to set up OpenSSH with shared key authentication.  It’s something I’ve used at work (after it was set up) but I’ve never done it for my own purposes.  I was amazed at how easy it is to set up and how much you get with that setup.  I was expecting a console session and that’s it.  Instead I was able to begin using things like SSH tunneling, proxies, and SCP immediately!

The SSH tunneling was of particular interest to me, I use LogMeIn Hamachi to remote into my home machine nearly anywhere I go, but Hamachi has its limits.  It doesn’t run on everything, and offers nearly no ability to remote through phones.  SSH works nearly anywhere, I even got my phone working with remote access, and I expect my iPad and TouchPad to work with it too.  And to be frank about it, I found RDP through SSH to be snappier than through Hamachi. That surprised me, I believe Hamachi is a direct connection after it negotiates with the LogMeIn servers; I expected there to be no real difference in speed switching to SSH.  Now that I have it set up though, I can see why this is considered the standard for remote access.  It’s secure, it’s open, and it’s fast.

What all of this means is that I now have a fully configured media server than my roommates and I can access and push files to without worry, as it has the power to transcode on the fly.  And the ability to access it anywhere I can use SSH.  But more importantly I’m familiar with XenServer and OpenSSH now, which I wasn’t before.  It’s been exciting setting all of this up, and I can’t wait to get more uses out of this hardware!

Working with webOS Enyo Web services in Google Chrome

The options described below are very useful for development, but equally dangerous. Enabling these options is a huge security risk and should not be used for normal browsing.

If you need these options enabled but still want to browse, please consider using Chromium as a development browser with these options.

I’ve been writing code for in HP’s new Enyo framework for webOS, and a constant issue has been that WebServices can only be run in the emulator.  Webservices are Enyo’s abstraction of XMLHttpRequest, basically.  One of Enyo’s biggest strengths is that it can be tested in any Webkit based browser, but when you get to the internet access portion of testing (usually the biggest part!) you have to move to the emulator.

Fortunately, there is a fix!  As noted above, do not leave this on by default as it is a huge security risk.  This disables the file access and same origin protections, allowing you to perform webservices calls in Chrome.

To do this, run Chrome with the following command line options:

--allow-file-access-from-files --disable-web-security

In windows, you can add these to a shortcut (after the quotes, if present) just be sure to make the double hyphens a single hyphen.  On OSX you can copy and paste the command line options above.  For OSX you’d want to use a script unless you want to run it from the command line each time.  If you’ll be spending a lot of time within Enyo, you may want to download Chromium and use that for development work.  Again, browsing with these options enabled is a significant security risk.

Thanks for reading!

New version of Halo Stats submitted to Palm!

A new version of Halo Stats has been submitted to Palm.  I can’t post further details at this time.

In other news, I have a project I finished last month that will be posted soon.  It’s pretty far away from code and computers, so it should make for an interesting post.  And I’m still looking for application ideas.  I really wanted to make a Yelp application for the Pre that supports checking in, but their API does not allow it at this time.

The ability to create, but no ideas on what to create. Who would’ve thought coders can get writer’s block?

8-Bit Megaman Blaster and Charging sounds

I’ve been assisting Klowner with getting the sounds for his Megaman costume. Several of us had trouble finding these sounds on the net, so I figured I’d host the ones we recorded from Megaman 6.

These are property of Capcom and I assume that by downloading these files that you have fair use rights to them.

Megaman Blaster Sound (wav/35kb)

Megaman Charging Sound (wav/2mb)

Samsung N120 screen replacement

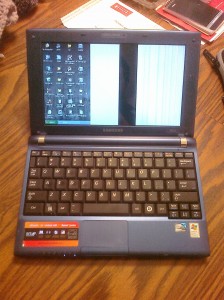
So remember the MacBook Air I bought? And how I mentioned something happened to the NetBook? Well…

That’s what I was talking about. My sister took it with her to a family reunion in Sweden, where my cousins would break the screen while playing around.  Not a big deal, so I made my sister a deal.  If she would help me replace the Netbook, I would attempt to repair the screen. If I could, it’s hers. If not, she can use the replacement I buy until she can afford her own.

Details of the repair follow:

Read more »

Adding Heatsinks to a Hauppauge WinTV-HVR-950Q

This weekend I finally bought a membership for the QC Co-Lab, and took the opportunity to work on the TV Tuner modification I talked about previously.

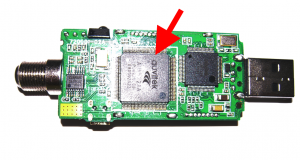
Again, it’s a Hauppauge WinTV-HVR-950Q that I got from Newegg, and while I was using it, I noticed the main chip was getting hot.  While I can’t claim it had any noticable impact on image quality or performance, I just wasn’t comfortable with the casing becoming too hot to touch.  So I removed the casing and started watching TV to see which chip heated up.  That chip is pointed out here:

TV Tuner - Case Removed

TV Tuner - Case Removed

Looking up the chip, it’s an Auvitek AU8522AA, the ATSC / NTSC decoder for the incoming signal. It makes sense that it would get so hot.  So the next step is to order the heatsinks, I chose these from Newegg. Once I had those, I tested them on the bare TV Tuner, and found I actually needed two:

Heatsinks on TV Bare Tuner

While the larger chip was generating the majority of the heat, the smaller one heated up pretty well too.  Also, ideally I would’ve bought two sets of heatsinks, a larger set for the main chip, and then used the ones I have for the smaller chip.  But at $15 for these heatsinks, I wasn’t willing to spend more.

Next up was marking the casing for the holes.  Originally I had planned on using a stamp ink pad to mark the pins, and press that against the casing to determine where the holes should go.  I forgot to buy one, so I had to improvise on site with some thermal grease.

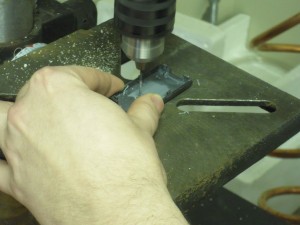
While I was discussing this with my friend Ben, he enthusiastically volunteered to start the drilling, so I took the chance for another picture:

Case being drilled.

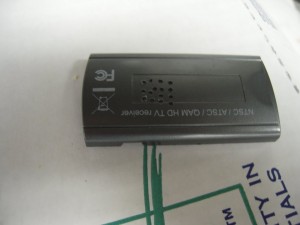
Unfortunately that drill has a bit of vibration on it.  So the holes didn’t line up with the precision we were hoping for:

Holes in casing

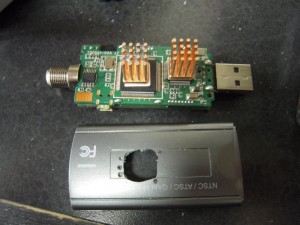
Not a problem, I just cleared out a larger hole to fit the entire heatsink through.

Larger hole in casing.

On the second set of holes, I marked through the thermal grease with some marker to help line things up.  The drill still had a lot of give though, so it wasn’t going to line up properly.  I had to re-drill the same holes several times before the entire heatsink would fit through.

Both heatsinks through their openings - Note the per-rod holes for the second heatsink.Closeup of Heatsink with individual rod openings.

I’m so happy that I got this shot, when I was mentally picturing this project, this is what I wanted.  Individual openings for each heatsink rod, with space inbetween to keep it inside and pressed onto the chip.

Unfortunately, the bases on the heatsink were taller than I expected, and I couldn’t fit the entire casing back on with the openings done this way.  So the second heatsink has a full opening like the first one.  Here is the final result, after I swapped the marked heat sinks for fresh ones:

Finished mod, with both heat sinks.

While this definitely looks home made, I think it still looks clean and presentable.

As for the results of the mod:  Over time, the entire casing can still get pretty hot, the heatsinks themselves get too hot to touch after about an hour of watching or so.  Performance is effectively unchanged, since it was working correctly before this modification, but I’m much more comfortable with it knowing the heatsinks are pulling away a lot of that heat.

And also, if you want to see some other QC Co-Lab pictures, they are available in this Picasa album: http://goo.gl/USaNb

Thanks for reading!

New sub-site: Dropbox Portal

I’ve added a Dropbox Portal to the website, so if you need to send me a file (and have the password) you can send it via this address:

http://dropbox.john-am.com

And it will be sent to any device I own with Dropbox installed. Fortunately, that’s a lot of devices.  I originally saw this on LifeHacker, and when I decided to add it the other day I saw the original author had added password protection.  So I took his password protection and added it into the existing design at addictivetips. Giving you the result you see now.

The address will always be available in the links section, so get in touch with me for the password and send me some files!