Author Archives: John - Page 2

Temporarily changing print margins in Access 2003

I didn’t see a good resource for this when I was searching through Google, so I figured I’d type up something 🙂  It’s easy enough to determine through the Excel commands that show up everywhere, but here is a version for Access.

What the code below does is grab your current margin settings, switch them to the settings you need for your form, print, and switch them back afterwards.  The four MsgBox lines are for debugging purposes, since I’ve seen a few different numbers for “points per inch” online.  The most likely numbers are 1440 or 72.

Finally, be sure to switch out DatabaseName.Form_FormNameForm with your Database Name and Form Name as appropriate.

Here is the VBA code:

    'Record set margins.
    'Access records margins in points. There are 1440 points in an inch.
    Dim intPointsPerInch
    intPointsPerInch = 1440

    'Getting the original margins and storing them.
    Dim orgLeftMargin, orgRightMargin, orgTopMargin, orgBottomMargin
    orgLeftMargin = DatabaseName.Form_FormNameForm.Printer.LeftMargin
    orgRightMargin = DatabaseName.Form_FormNameForm.Printer.RightMargin
    orgTopMargin = DatabaseName.Form_FormNameForm.Printer.TopMargin
    orgBottomMargin = DatabaseName.Form_FormNameForm.Printer.BottomMargin

    'These lines are for debuging purposes.
    'They can be left commented out, or even deleted.
    'If your margins are off, these will show you the original margins in points.
    'MsgBox "Left: " & orgLeftMargin, vbOKOnly
    'MsgBox "Right: " & orgRightMargin, vbOKOnly
    'MsgBox "Top: " & orgTopMargin, vbOKOnly
    'MsgBox "Bottom: " & orgBottomMargin, vbOKOnly

    'Here the "1"s are inches for each margin. Replace as needed.
    With DatabaseName.Form_FormNameForm.Printer
    .LeftMargin = 1 * intPointsPerInch
    .RightMargin = 1 * intPointsPerInch
    .TopMargin = 1 * intPointsPerInch
    .BottomMargin = 1 * intPointsPerInch
    End With

    'Print Commands.  Change as needed for your database.
    DoCmd.DoMenuItem acFormBar, acEditMenu, 8, , acMenuVer70
    DoCmd.PrintOut acSelection

    'Changing the margins back.
    With DatabaseName.Form_FormNameForm.Printer
    .LeftMargin = orgLeftMargin
    .RightMargin = orgRightMargin
    .TopMargin = orgTopMargin
    .BottomMargin = orgBottomMargin
    End With

Hope you found this useful!

Cannot make an MDE file in Access, even with a low form / table count.

I was working on an Access Database today, and when I tried to make a new MDE I got the “Microsoft Access was unable to create an MDE database” error.  Specifically, it said I may have too many tables or forms, since the limit was 2048.  Having a total of about 4 forms and 3 tables, I doubted that was the problem.

Turns out if you have a VBScript error the MDE creation will fail as well.   In my case I had deleted a form control but was still referencing it in code.  Fixing that solved the problem.  To do so, open the code editor in access, then go to Tools -> Compile.  If there are any errors it will alert you right away.  Fortunately for me it was just one 🙂

Just another reference for myself.  Thanks for reading!

Working with webOS Enyo Web services in Google Chrome

The options described below are very useful for development, but equally dangerous. Enabling these options is a huge security risk and should not be used for normal browsing.

If you need these options enabled but still want to browse, please consider using Chromium as a development browser with these options.

I’ve been writing code for in HP’s new Enyo framework for webOS, and a constant issue has been that WebServices can only be run in the emulator.  Webservices are Enyo’s abstraction of XMLHttpRequest, basically.  One of Enyo’s biggest strengths is that it can be tested in any Webkit based browser, but when you get to the internet access portion of testing (usually the biggest part!) you have to move to the emulator.

Fortunately, there is a fix!  As noted above, do not leave this on by default as it is a huge security risk.  This disables the file access and same origin protections, allowing you to perform webservices calls in Chrome.

To do this, run Chrome with the following command line options:

--allow-file-access-from-files --disable-web-security

In windows, you can add these to a shortcut (after the quotes, if present) just be sure to make the double hyphens a single hyphen.  On OSX you can copy and paste the command line options above.  For OSX you’d want to use a script unless you want to run it from the command line each time.  If you’ll be spending a lot of time within Enyo, you may want to download Chromium and use that for development work.  Again, browsing with these options enabled is a significant security risk.

Thanks for reading!

Halo Stats for Touchpad!

This wouldn’t be hard to guess, but I did a quick re-write of Halo Stats for the HP TouchPad! Details available here:

Halo Stats for TouchPad – Official HP Page

New version of Halo Stats submitted to Palm!

A new version of Halo Stats has been submitted to Palm.  I can’t post further details at this time.

In other news, I have a project I finished last month that will be posted soon.  It’s pretty far away from code and computers, so it should make for an interesting post.  And I’m still looking for application ideas.  I really wanted to make a Yelp application for the Pre that supports checking in, but their API does not allow it at this time.

The ability to create, but no ideas on what to create. Who would’ve thought coders can get writer’s block?

8-Bit Megaman Blaster and Charging sounds

I’ve been assisting Klowner with getting the sounds for his Megaman costume. Several of us had trouble finding these sounds on the net, so I figured I’d host the ones we recorded from Megaman 6.

These are property of Capcom and I assume that by downloading these files that you have fair use rights to them.

Megaman Blaster Sound (wav/35kb)

Megaman Charging Sound (wav/2mb)

Halo Stats 0.7.7 submitted to Palm.

The new version of Halo Stats has been submitted to Palm. It corrects an error with K/D ratios, and hopefully resolves and issue where the text box wouldn’t appear on WebOS 2.1.0 devices.

UPDATE: I made an error in submitting the program, for right now the update is only available to webOS 2.0+ devices. This is being corrected and the updated application should be available on 1.4.5+ devices soon.

Dad

This is one of those things you never think you’ll have to say, or write.  And I want to be respectful and say something, but it’s also very hard to type this.  But my Dad passed away on 2/28/11.

My Dad and I

My Dad and I, around March or April 2010

If you had the chance to meet him, you know he was a kind, respectful person.  And as his son, I couldn’t have asked for a better Father.  He will be missed.

I hope to be posting again soon.  I just wanted to say something about my Dad.

Samsung N120 screen replacement

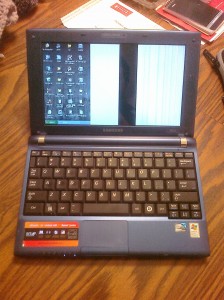
So remember the MacBook Air I bought? And how I mentioned something happened to the NetBook? Well…

That’s what I was talking about. My sister took it with her to a family reunion in Sweden, where my cousins would break the screen while playing around.  Not a big deal, so I made my sister a deal.  If she would help me replace the Netbook, I would attempt to repair the screen. If I could, it’s hers. If not, she can use the replacement I buy until she can afford her own.

Details of the repair follow:

Read more »

Adding Heatsinks to a Hauppauge WinTV-HVR-950Q

This weekend I finally bought a membership for the QC Co-Lab, and took the opportunity to work on the TV Tuner modification I talked about previously.

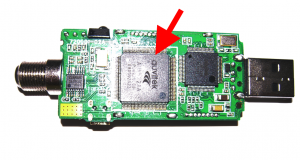
Again, it’s a Hauppauge WinTV-HVR-950Q that I got from Newegg, and while I was using it, I noticed the main chip was getting hot.  While I can’t claim it had any noticable impact on image quality or performance, I just wasn’t comfortable with the casing becoming too hot to touch.  So I removed the casing and started watching TV to see which chip heated up.  That chip is pointed out here:

TV Tuner - Case Removed

TV Tuner - Case Removed

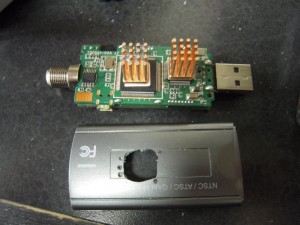
Looking up the chip, it’s an Auvitek AU8522AA, the ATSC / NTSC decoder for the incoming signal. It makes sense that it would get so hot.  So the next step is to order the heatsinks, I chose these from Newegg. Once I had those, I tested them on the bare TV Tuner, and found I actually needed two:

Heatsinks on TV Bare Tuner

While the larger chip was generating the majority of the heat, the smaller one heated up pretty well too.  Also, ideally I would’ve bought two sets of heatsinks, a larger set for the main chip, and then used the ones I have for the smaller chip.  But at $15 for these heatsinks, I wasn’t willing to spend more.

Next up was marking the casing for the holes.  Originally I had planned on using a stamp ink pad to mark the pins, and press that against the casing to determine where the holes should go.  I forgot to buy one, so I had to improvise on site with some thermal grease.

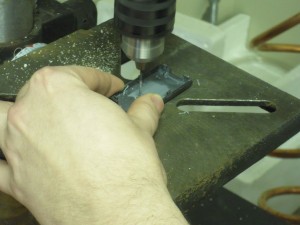
While I was discussing this with my friend Ben, he enthusiastically volunteered to start the drilling, so I took the chance for another picture:

Case being drilled.

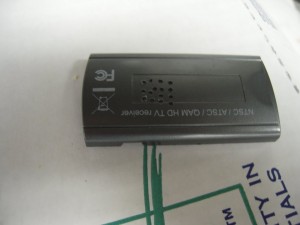
Unfortunately that drill has a bit of vibration on it.  So the holes didn’t line up with the precision we were hoping for:

Holes in casing

Not a problem, I just cleared out a larger hole to fit the entire heatsink through.

Larger hole in casing.

On the second set of holes, I marked through the thermal grease with some marker to help line things up.  The drill still had a lot of give though, so it wasn’t going to line up properly.  I had to re-drill the same holes several times before the entire heatsink would fit through.

Both heatsinks through their openings - Note the per-rod holes for the second heatsink.Closeup of Heatsink with individual rod openings.

I’m so happy that I got this shot, when I was mentally picturing this project, this is what I wanted.  Individual openings for each heatsink rod, with space inbetween to keep it inside and pressed onto the chip.

Unfortunately, the bases on the heatsink were taller than I expected, and I couldn’t fit the entire casing back on with the openings done this way.  So the second heatsink has a full opening like the first one.  Here is the final result, after I swapped the marked heat sinks for fresh ones:

Finished mod, with both heat sinks.

While this definitely looks home made, I think it still looks clean and presentable.

As for the results of the mod:  Over time, the entire casing can still get pretty hot, the heatsinks themselves get too hot to touch after about an hour of watching or so.  Performance is effectively unchanged, since it was working correctly before this modification, but I’m much more comfortable with it knowing the heatsinks are pulling away a lot of that heat.

And also, if you want to see some other QC Co-Lab pictures, they are available in this Picasa album: http://goo.gl/USaNb

Thanks for reading!